Temporal Anti-Aliasing
这里主要根据论文和Unity HDRP的TAA算法进行简单的分析。
资料主要参考的是 2016 Temporal Reprojection AA INSIDE.
源代码主要来自Unity的两个shader文件:
TemporalAntiliasing.hlsl和TemporalAntialising.compute.
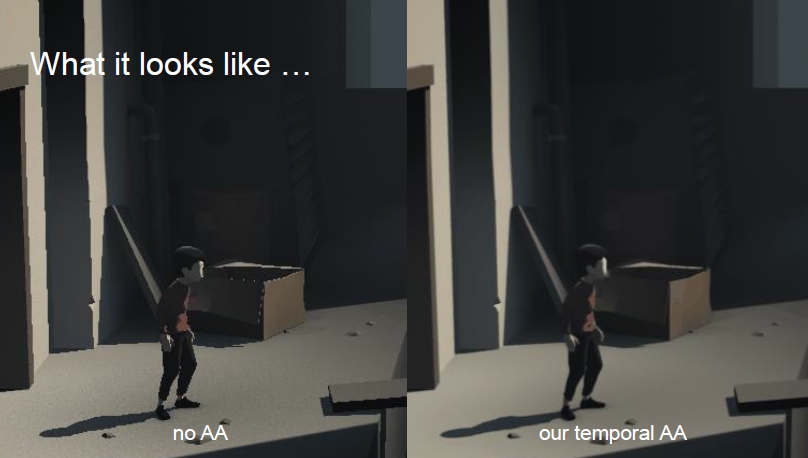
下面是TAA在INSIDE当中的效果比较:
基础思路
下面是TAA依赖的一些基本思路:
- 一个表面的局部区域可能在视口当中存在很多帧。
- 观察者和物体的位置在变,光栅化结果也在变化。
- 如果能够向前获取一段时间的变化,那么可以根据变化调整当前帧的光栅化结果。
记录之前的变化:
- 为了根据之前几帧的结果调整当前帧。
- 能够通过reprojection获得之前的变化:依赖于深度,局限在最新写入的几帧。
- 有时会获取不到之前的结果(前几帧没有出现过)。
unity算法步骤
Step1:Jitter
在TAA算法当中,Jitter的作用实际上就是采样屏幕颜色的时候,对纹理坐标做一个offset。使得:实际采样的位置在目标位置附近伴随时间随机的变化。
在很多地方Jitter的这个offset使用了:Halton Sequence。
下面是一维度Halton Sequence的伪代码:
float HS(int i, int b) :
	float f = 1
    float r = 0
    while i < 0 do
        f = f/b
        r = r + f * (i mod b)
        i = floor(i/b)
    return r

/*
HS(1,2) = 1 / 2  HS(2,2) = 1 / 4  HS(3,2) = 3 / 4  ...
HS(1,3) = 1 / 3  HS(2,3) = 2 / 3  HS(3,3) = 1 / 9  ...
*/
下面是2维Halton的分布:
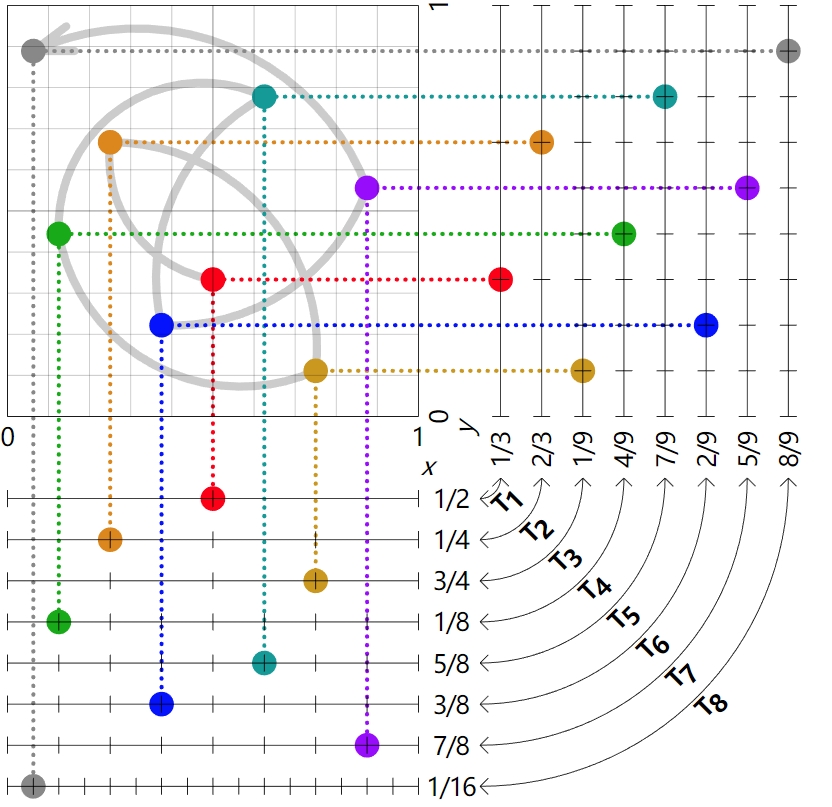
上面的点集为:
(HS(1,2), HS(1,3) ) ,(HS(2,2), HS(2,3) ),(HS(3,2), HS(3,3) ),(HS(4,2), HS(4,3) )..
unity计算jitter的源代码,可以看出jitter如何被使用,TemporalAntialising.compute:
...
jitter = _TaaJitterStrength.zw;
...
// 这里是Unjitter,去掉了jitter,positionNDC是jitter
uv = posInputs.positionNDC - jitter;
color = Fetch(_InputTexture, uv, 0.0, _ScreenToTargetScale.xy);
...
_TaaJitterStrength在C#代码中的设置位置,HDCamera.cs:
...
cmd.SetGlobalVector(HDShaderIDs._TaaJitterStrength,         taaJitter);
...
计算方式,HDCamera.cs:
...
float jitterX = HaltonSequence.Get((taaFrameIndex & 1023) + 1, 2) - 0.5f;
float jitterY = HaltonSequence.Get((taaFrameIndex & 1023) + 1, 3) - 0.5f;
taaJitter = new Vector4(jitterX, jitterY, jitterX / camera.pixelWidth, jitterY / camera.pixelHeight);
...
上面内容都属于HDCamera当中的一个重要的方法,就是:
Matrix4x4 GetJitteredProjectionMatrix(Matrix4x4 origProj)
{
    float jitterX = HaltonSequence.Get((taaFrameIndex & 1023) + 1, 2) - 0.5f;
    float jitterY = HaltonSequence.Get((taaFrameIndex & 1023) + 1, 3) - 0.5f;
    taaJitter = new Vector4(jitterX, jitterY, jitterX / camera.pixelWidth, jitterY / camera.pixelHeight);

    const int kMaxSampleCount = 8;
    // taaFrameIndex 只在这里更新,kMaxSampleCount是8.
    if (++taaFrameIndex >= kMaxSampleCount)
        taaFrameIndex = 0;

    Matrix4x4 proj;

    if (camera.orthographic)
    {
        ...
    }
    else
    {
        // 得到多个分离的剪裁平面
        var planes = origProj.decomposeProjection;

        // 计算观察范围
        float vertFov = Math.Abs(planes.top) + Math.Abs(planes.bottom);
        float horizFov = Math.Abs(planes.left) + Math.Abs(planes.right);

        // 按比例缩放
        var planeJitter = new Vector2(jitterX * horizFov / camera.pixelWidth,
                                      jitterY * vertFov / camera.pixelHeight);

        // 抖动平移整个视锥体
        planes.left += planeJitter.x;
        planes.right += planeJitter.x;
        planes.top += planeJitter.y;
        planes.bottom += planeJitter.y;
		// 还原成投影矩阵
        proj = Matrix4x4.Frustum(planes);
    }
    return proj;
}
/*
Matrix4x4.Frustum(planes):
下面查看这个函数意义:
https://docs.unity3d.com/ScriptReference/Matrix4x4.Frustum.html
The coordinate of the near projection plane in view space.
*/
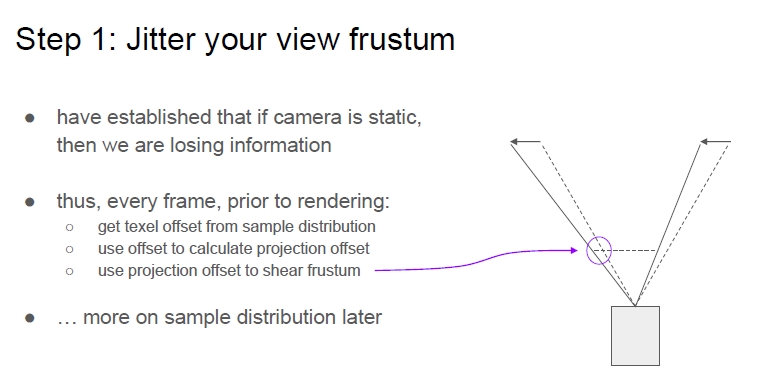
上面的方法主要是通过抖动近剪裁面来实现对整个视锥体的抖动。
唯一对他的调用是下面的方法,这个方法主要用来更新摄像机的:
internal void UpdateViewConstants(bool jitterProjectionMatrix)
{
    // If TAA is enabled projMatrix will hold a jittered projection matrix. The original,
    // non-jittered projection matrix can be accessed via nonJitteredProjMatrix.
    var nonJitteredCameraProj = camera.projectionMatrix;
    var cameraProj = jitterProjectionMatrix
        ? GetJitteredProjectionMatrix(nonJitteredCameraProj)
        : nonJitteredCameraProj;
    ...
}
制作后处理的时候关闭,HDRenderPipeline.cs:
  using (new ProfilingSample(cmd, "After Post-process", CustomSamplerId.AfterPostProcessing.GetSampler()))
  {
      // Note about AfterPostProcess and TAA:
      // When TAA is enabled rendering is jittered and then resolved during the post processing pass.
      // It means that any rendering done after post processing need to disable jittering. This is what we do with hdCamera.UpdateViewConstants(false);
      // The issue is that the only available depth buffer is jittered so pixels would wobble around depth tested edges.
      // In order to avoid that we decide that objects rendered after Post processes while TAA is active will not benefit from the depth buffer so we disable it.
      bool taaEnabled = hdCamera.IsTAAEnabled();
      hdCamera.UpdateViewConstants(false);
  }
绘制物体的时候开启,HDCamera.cs:
// Pass all the systems that may want to update per-camera data here.
// That way you will never update an HDCamera and forget to update the dependent system.
public void Update(FrameSettings currentFrameSettings, VolumetricLightingSystem vlSys, MSAASamples msaaSamples)
{
    UpdateViewConstants(IsTAAEnabled());
到此为止Jitter步骤结束,总结如下:
Step2: ReProjection
Reprojection就是讲当前jitter的点还原到历史点的位置。
动态场景历史点还原
示意图如下:
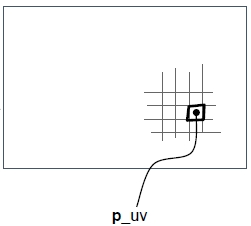
首先获取到了当前帧当前点的屏幕uv。
在视锥体中的示意图:
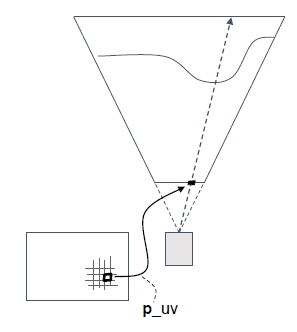
然后通过当前帧当前点的深度图还原其世界坐标:
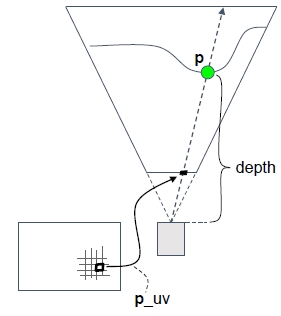
然后通过记录的上一个摄像机机位的变换矩阵,还原当前点在上一帧的所在屏幕位置。
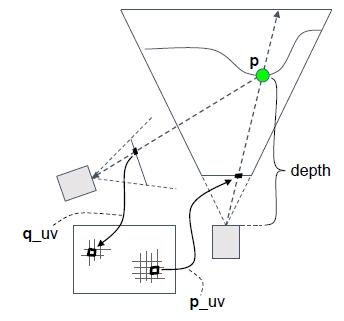
然后就可以在上一帧的colorbuffer采样上一帧的颜色:
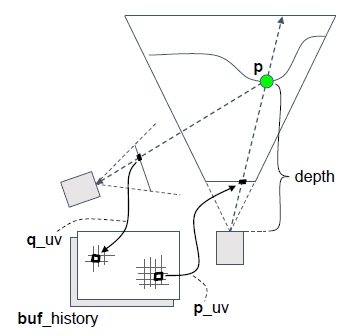
动态场景历史点还原
动态物体可以渲染velocity buffer,记录了其在屏幕上移动的向量:
通过减去速度可以恢复到上一帧的位置:
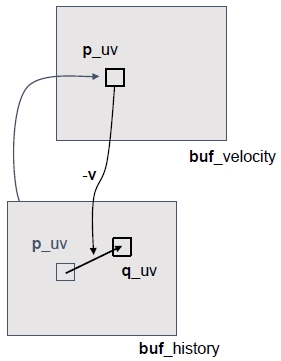
VelocityBuffer一般是先通过摄像机运动计算场景中静态物体的运动速度,然后在上面继续绘制动态物体的运动速度
Unity读取历史信息的代码:
...
float2 motionVector;
DecodeMotionVector(LOAD_TEXTURE2D_X(_CameraMotionVectorsTexture, closest), motionVector);
float3 history = Fetch(_InputHistoryTexture, posInputs.positionNDC - motionVector, 0.0, _ScreenToTargetScaleHistory.xy);
...
上面可以看出unity的TAA依赖于VelocityBuffer的绘制。
Step3: Revisiting
上一步当中我们已经读取到了历史信息位置,那么现在就需要在历史纹理当中读取信息并且用于计算。
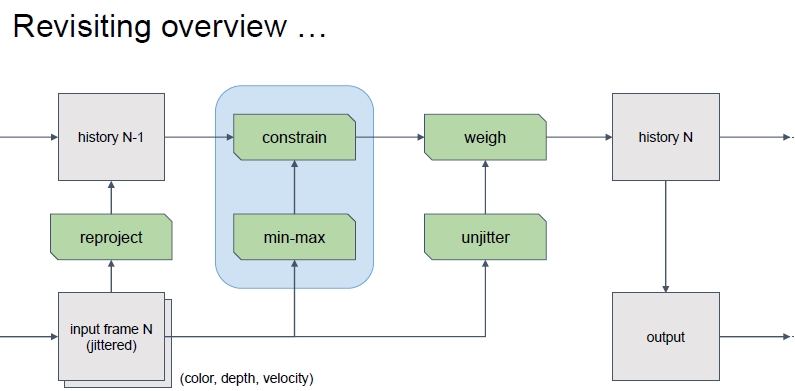
首先需要解决的是历史信息不正确的状态。
通过当前像素来控制历史信息的最大最小值,下面是Unity的做法:
   ...
   float2 uv = posInputs.positionNDC - jitter;

    float3 color = Fetch(_InputTexture, uv, 0.0, _ScreenToTargetScale.xy);
    float3 history = Fetch(_InputHistoryTexture, posInputs.positionNDC - motionVector, 0.0, _ScreenToTargetScaleHistory.xy);

    float3 topLeft = Fetch(_InputTexture, uv, -RADIUS, _ScreenToTargetScale.xy);
    float3 bottomRight = Fetch(_InputTexture, uv, RADIUS, _ScreenToTargetScale.xy);

    float3 corners = 4.0 * (topLeft + bottomRight) - 2.0 * color;

    // Sharpen output
    #if SHARPEN
    float3 topRight = Fetch(_InputTexture, uv, float2(RADIUS, -RADIUS), _ScreenToTargetScale.xy);
    float3 bottomLeft = Fetch(_InputTexture, uv, float2(-RADIUS, RADIUS), _ScreenToTargetScale.xy);
    float3 blur = (topLeft + topRight + bottomLeft + bottomRight) * 0.25;
    color += (color - blur) * SHARPEN_STRENGTH;
    #endif

    color = clamp(color, 0.0, CLAMP_MAX);

    float3 average = Map((corners + color) / 7.0);

    topLeft = Map(topLeft);
    bottomRight = Map(bottomRight);
    color = Map(color);

    float colorLuma = Luminance(color);
    float averageLuma = Luminance(average);
    float nudge = lerp(4.0, 0.25, saturate(motionVecLength * 100.0)) * abs(averageLuma - colorLuma);

    float3 minimum = min(bottomRight, topLeft) - nudge;
    float3 maximum = max(topLeft, bottomRight) + nudge;

    history = Map(history);

    // Clip history samples
    #if CLIP_AABB
    history = ClipToAABB(history, minimum, maximum);
    #else
    history = clamp(history, minimum, maximum);
    #endif
    ...
下面进行TAA的核心操作:
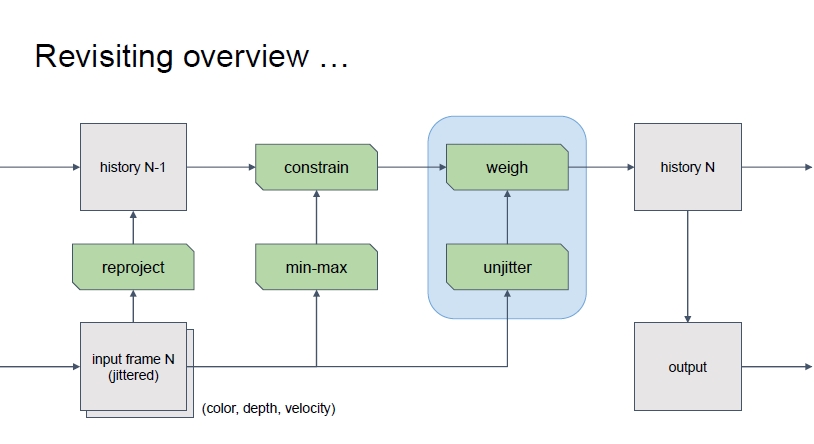
进行颜色混合:经过约束的历史颜色和没有抖动的当前颜色
c_hist = ...//constrained history sample
c_in = sample(buf_color, unjitter_uv);
c_feedback = lerp(c_in, c_hist, k_feedback);
保留当前结果作为历史,并输出当前结果:
rt_history = c_feedback
rt_output = rt_history
k_feedback可以调整效果。
Unity 中的TAA是自动的来计算feedback值,TemporalAntialiasing.compute:
...
float historyLuma = Luminance(history);
float diff = abs(colorLuma - historyLuma) / Max3(colorLuma, historyLuma, 0.2);
float weight = 1.0 - diff;
float feedback = lerp(FEEDBACK_MIN, FEEDBACK_MAX, weight * weight);
...
Unity在计算之后,还会再次Clamp颜色:
...
color = Unmap(lerp(color, history, feedback));
color = clamp(color, 0.0, CLAMP_MAX);
...
然后是结果输出:
...
_OutputTexture[COORD_TEXTURE2D_X(posInputs.positionSS)] = float4(color.xyz, 1.0);
_OutputHistoryTexture[COORD_TEXTURE2D_X(posInputs.positionSS)] = float4(color.xyz, 1.0);
...
到此为止TAA就结束了,不过还可以加入MotionBlur,Unity没有加到TAA步骤当中,这个打算之后在研究。
参考资料
[1] 2016 Temporal Reprojection AA INSIDE.
[2] Unity HDRP TAA 源代码:TemporalAntialising.compute.